
Two weeks ago I discussed when you should and when you shouldn’t clean a dog’s ears. Now let’s talk about how to do it and what to use.
Most of the techniques and products mentioned can also be used in cats.
How To Clean Dog Ears At Home
I stand by my methods although they aren’t exactly the same as you’ll read elsewhere. Clean ears in a place where you don’t mind the cleaner and wax being flicked all over, including the ceiling!
Step 1: Look For Signs Of Infection
Ear cleaning is likely to do more harm than good if your dog is showing any of the following signs:
- Head shaking or ear scratching
- A head tilt or holding the ear down
- An ear odour that’s different from elsewhere on their body
- Redness or swelling around the ear opening
If one or more of these is present, please get a checkup before putting anything in the ear.
Step 2: Choose The Right Product
There is a wide variety of ear cleaning products available. Choosing the right one should be based on your dog’s needs and your vet’s advice.
| Australian Ear Cleaners | Comments |
|---|---|
| Virbac Epi‐Otic® | Acidic cleaner & disinfectant |
| PAW Gentle Ear Cleaner® | Gentle ear cleaner |
| Sonotix Ear Cleaner® | Neutral pH ear cleaner |
| Dermcare Otoflush® | Neutral pH cleaner & antiseptic* |
| Ilium Oticlean® | Acidic cleaner & disinfectant |
| Alpha & kLeo Ear Cleaner® | Acidic cleaner & drying agent* |
| Ear Canker Drops® | Ear mite & canker treatment† |
In my experience:
- Acidic cleaners are best suited for the prevention of recurrent yeast infections
- Otoflush works best for recurrent bacterial infection
- PAW and Sonotix work best for excessive wax buildup.
- as for Ear Canker Drops, I still haven’t found a use where there isn’t a much better product
Click here for an evidence-based review of international ear cleaners.
Step 3: Apply A Trial Amount
Ear canals are long, narrow and crooked, so you can never be sure you haven’t missed a deep infection. Therefore start by inserting a trial amount.
Place only five drops of ear cleaner in each ear, give a treat, and step back to observe. Your dog or cat will shake it out in a few seconds and then go about their regular business.
If they keep scratching at the ear or show any signs of discomfort, do not proceed further. See your vet immediately.
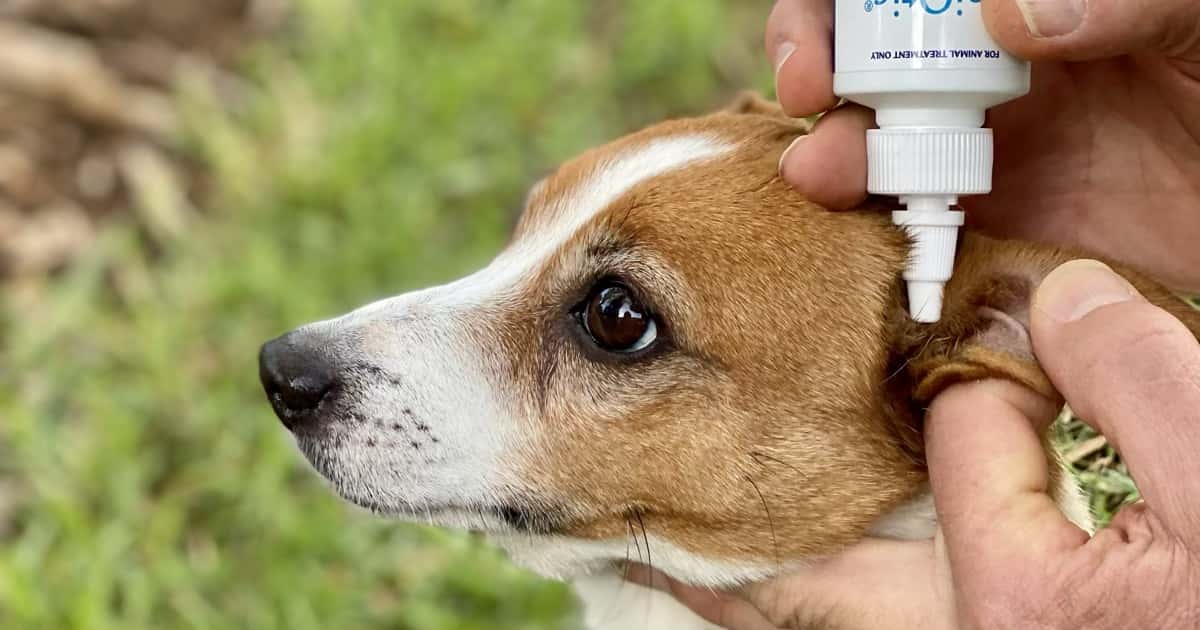
Step 4: Apply The Full Amount
Now pour the cleaner into one ear canal until it begins to overflow. You’ll probably use 3-5mL to do so. The whole time, use a second person if available to give treats and prevent head shaking.
Ear cleaner is better tolerated if it is at body temperature, so a pro tip is to carry it in your pocket for 30 minutes before use.
Step 5: Massage The Ear Canal
To massage the cleaner in effectively, you need to know dog ear anatomy. The ear canal goes almost vertically down for half its length, before turning in towards the midline.
Therefore, feel for the tubular shape of the canal running down the side of the head below the opening. It feels like silicon rubber and you can gently grasp it between finger and thumb.
Squeeze and ‘milk’ the canal in a downwards motion. You should hear a satisfying squelching sound, and your dog should like it, not hate it. Again, if it causes discomfort, stop and see a vet.
Step 6: Rinse And Repeat
Holding the head to prevent shaking, slide your hands around to the other side of the head. You’re trying to let the first ear soak for as long as possible. Therefore, it’s good to reverse the order the next time you do it.
Now repeat steps 4 and 5 in the second ear. Afterwards, I like to continue holding and patting a dog’s head for a few minutes, all the while telling them how good they are. Once again, this is to allow it to soak in a little.
Step 7: Shake!
The only reasons you may not allow shaking is if you’re somewhere you don’t want mess, or if the dog has ear flap injuries. Otherwise, step back and let your dog rip.
They should have a good shake, take a break and then shake again. This expels more debris than trying to drain the ears using cotton wool.
Step 8: Dry Off The Excess
To finish, pat (never rub) the ear canal and ear flap with dry clean cloth or tissues. Do not put cotton buds (Q tips) in the ear canal, ever. A small amount of cleaner left behind should be OK.
You can very gently wipe extra wax from the outer folds. Use a make-up remover soaked in the ear cleaner, but please be careful; ear skin is very fragile.
In dogs with very hairy ears, you may need to apply a drying agent, but please only do this with your vet’s advice.
How Often To Clean Dog Ears
Many dogs do not need their ears cleaned. For those that do, once a week seems best. The frequency can then be adjusted in conversation with your vet.
Many vets recommend the use of ear cleaners before ointment during the treatment of otitis externa (ear infections). This would therefore be once or twice a day. I do not find this often to be necessary, but there are certainly times that I also recommend this.
It’s also important to bear in mind that excessive wax buildup may have an underlying cause that needs its own treatment. The best example is atopic dermatitis, but ear mites are a very common cause as well, especially in young dogs.
Lastly, keep an eye on the expiration date and quality of your cleaner. Even within the date, once they are opened they may degrade. This is especially true if you apply the drops by touching the nozzle to the ear or you leave it in a warm place.
I always unscrew the cap and look inside before use. If I see cloudiness or floaters, I throw it out and get a new one.
That’s it! These seven steps will altogether take you about five minutes once you get into the swing of it. Ear cleaning can be a regular weekly task without any inconvenience or discomfort if you do it right.
Have something to add? Comments (if open) will appear within 24 hours.
By Andrew Spanner BVSc(Hons) MVetStud, a vet in Adelaide, Australia. Meet his team here.
Our 7 year old undesexed male pedigree English Staffy was attacked by a Staffy of some description 5 days ago. We took him to our vet as there was damage to one ear, but our dog wouldn’t allow us to have a look inside. The vet said there was some damage but should be OK just with antibiotics (Amoxyclav 500 : 1 tab every 12 hrs with food). He sometimes shakes his head a little, holds it to the side, or holds his head down & to the side. Does this mean the injury in his ear could be infected or, could it be healing & itchy & aggravating him – which is more likely ??
Hi Jo-Anne. There’s no way of knowing without using sedation if he won’t let you look. It sounds like that might be a good idea now.